| Version 70 (modified by , 9 years ago) ( diff ) |
|---|
Table of Contents
User guide (git)
This documentation tries to follow the developement version of Py4bot. It may or may not be up-to-date.
For installation instructions, see here.
Usage overview
As Py4bot is a framework, you will find here a description of the main things you need to understand to write your own applications.
Refer to the complete API for more details about classes/methods used.
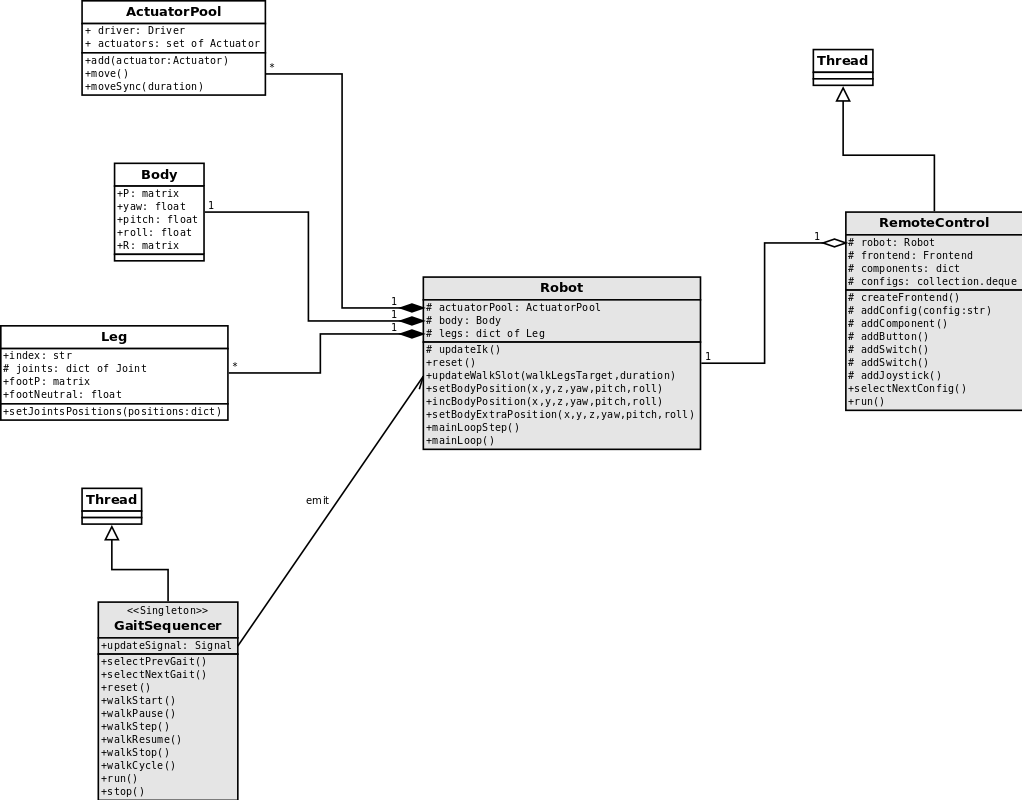
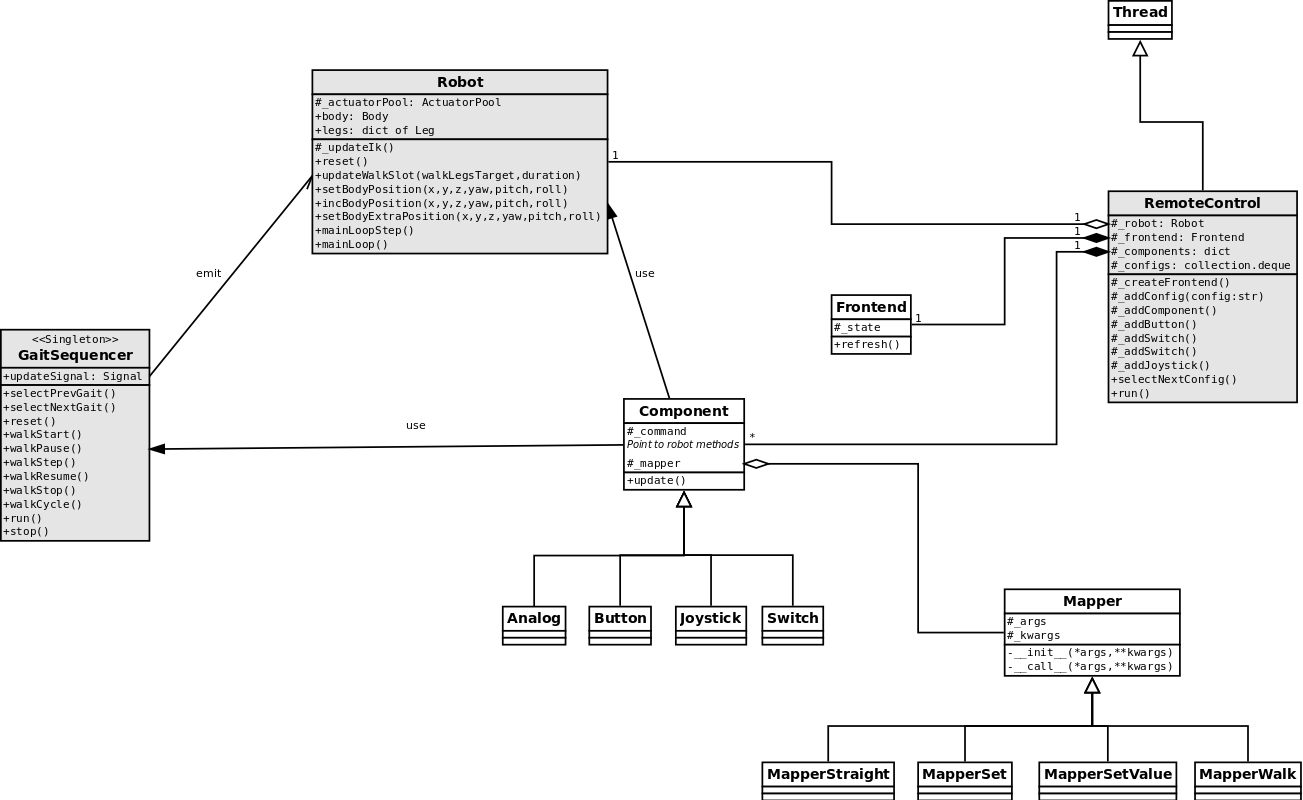
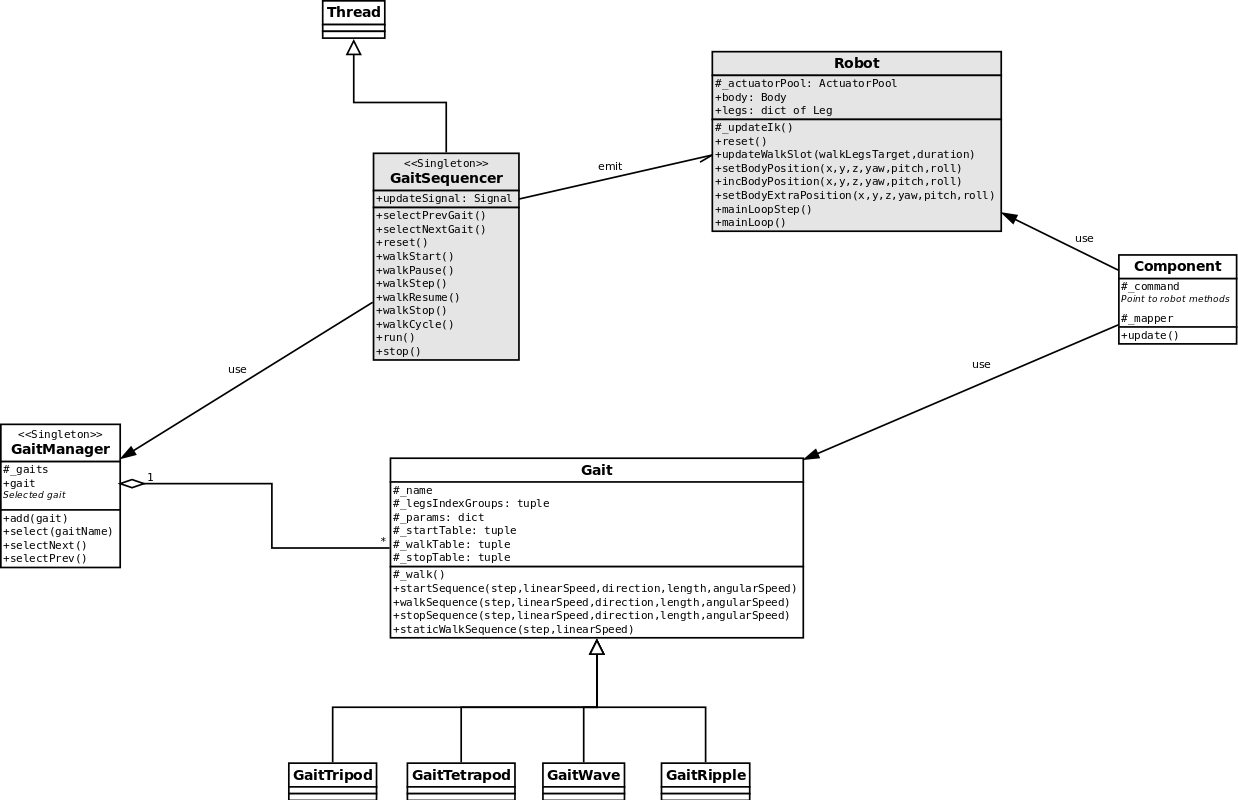
Architecture
The main parts of the framwork are:
- the robot itself;
- the gait sequencer;
- one or more remote controllers.

Each of these parts runs as separate thread. For now, the robot does nothing in its main loop, ans so, can be used for further devs (automatic stabilization...).
Geometry definition
There are several coordinates systems involved when computing maths in order to make a robot walk; it is important to understand how they are defined. All these systems are cartesian.
In the image below, X axis is in cyan, Y axis is in magenta, and Z axis is in yellow:

Robot coordinates system
This coordinates system is attached to the robot itself:
- the origin is at the center of the robot, in the ground plane
- X and Y axes are in the ground plane
- Y axis is the back-to-front axis of the robot
- Z axis points up
Body coordinates system
This coordinates system is attached to the body. It is defined from the robot coordinates system:
- the origin is at the center of the body
- X and Y axes define a plane parallel to the body
- Y axis is the back-to-front axis of the body
- Z define the top side of the body
This system is used to define the position of the body in the robot coordinates system, allowing it to move along the 6 DoF (3 translations, 3 rotations).
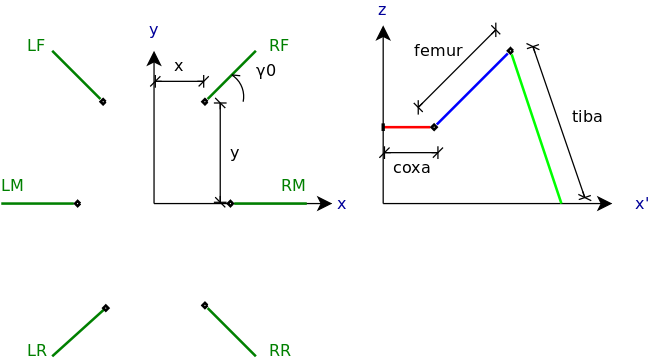
Legs coordinates systems
These coordinates systems are attached to the legs, so each leg has its own coordinates system. They are defined from the body coordinates system:
- the origin is at the coxa joint
- X and Y axes define a plane parallel to the body
- X axis is along the coxa of the leg
- Z points up
To summurize, from the body coordinate system, the legs coordinates systems are translated by (x, y) and rotated by gamma0 arround Z:

Todo: improve drawing
Feet coordinates systems
They are the last coordinates systems used in this framework, and they are used by the gaits, to make to robot walk.
They are defined from the robot coordinates system:
- the origins are at the center of the feet, in the ground plane
- X and Y axes are in the ground plane
- Y axis is the back-to-front axis of the robot
- Z axis points up
To summurize, from the robot coordinate system, the gaits coordinates systems are translated by (x, y).
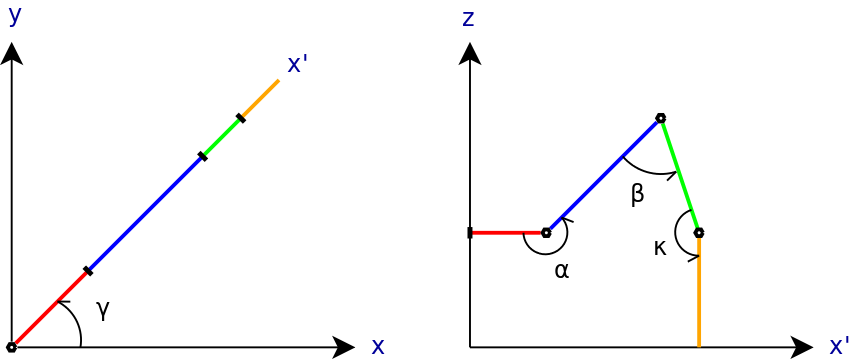
Inverse Kinematic
The Inverse kinematic is the the kinematic equations of a robot to determine the joints parameters that provide a desired position of leg (foot).
Here are the angles involved:
3 DoF leg
- gamma: angle of the leg in the the body X/Y plane (angle between body X axis and leg X axis)
- alpha: angle of the femur in the leg X/Z plane (angle between coxa and femur)
- beta: angle of the tibia in the leg X/Z plan (angle between femur and tibia)

4 DoF leg
- tars: angle of the tars in the leg X/Z plan (angle between tibia and tars)

Robot
The robot is responsible for all static computation, ie implements the inverse Kinematic. It also manages the body position, which can move along the 3 axes, and rotate arround 3 axes.
As shown in the tutorials, to implement a custom robot, you need to write a new class which inherits from Robot, and overload several methods:
_createBody(self)_createLegs(self)_createActuatorPool(self)
This is where you choose how many legs your robot has, and how many degrees of freedon (Dof) each leg has.
The Robot object has some usefull methods you will have to use in order to make your robot do smart things:
setBodyPosition(self, x=None, y=None, z=None, yaw=None, pitch=None, roll=None)
This method can only be called when the robot is in idle state.
It translates/rotates the body, and the new position is kept.
incBodyPosition(self, dx=0., dy=0., dz=0., dyaw=0., dpitch=0., droll=0.)
This methods can be called in any robot state.
Like the previous method, you can adjust the body position, by little steps.
setBodyExtraPosition(self, x=None, y=None, z=None, yaw=None, pitch=None, roll=None)
This method can only be called when the robot is in idle state.
Like the first method, you can translate/rotate the body. The resulting position of the body is the combination of the bodyPosition and the bodyExtraPosition.
The setBodyPosition() is mainly used at startup, to set a pre-defined position of the body. The setBodyExtraPosition(), however, can be usefull to move the body arround its default position, without loosing it.
- incFeetNeutral(self, dneutral)
This method can only be called when the robot is in idle state.
It allows you to extend/reduce the length of the legs. Each time this method is called, the robot will do a static walk, in order to put all feet to there new neutral position.
Actuators, Pools and Drivers
Actuators are the objects which really move the Joints.
Pools are used to group Actuators, mainly to moved them in a synchronized way. It is possible to have the same Actuator in several Pools, but, of course, you won't be able to drive both {Pools at the same time.
A Pool uses a Driver to really make the Actuators move.
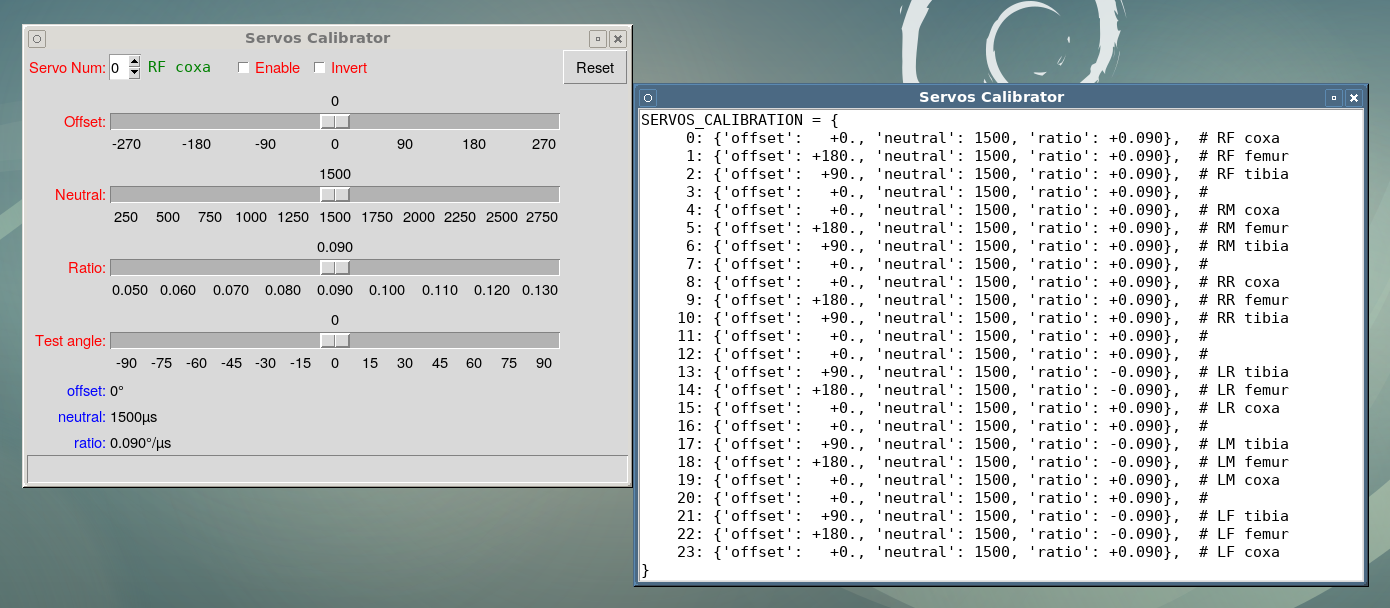
Servos calibration
There are different reasons why we need to calibrate your servos, depending on:
- how servos are attached to the robot
- what servos we actually use
- how accurate servos are
py4bot-gui-servocal.py script can be used to fine tune our servos calibration, and generate the SERVOS_CALIBRATION dict.

Most servos have a range of 180° (more or less), and their neutral position (mid-range) is around 1500µs. It is important to mount the servos on the robot so the we can reach the joints positions ranges we want.
The following picture shows the usual joints positions when servos are at neutral, for a 3 DoF leg:

Looking how Py4bot internally manages angles (UserGuideGit#a3DoFleg), we can see that matching joints positions are:
- coxa = 0°
- femur = 180°
- tibia = 90°
This means that there will be some offsets between the servo angles and the framework angles.
Another thing to tune is the servo neutral position, to correct mechanical errors.
Last thing to tune is the ratio between pulse variation and real servo displacement. This ratio varies a lot from a brand to another. And even for a same model, it varies from a servo to another. This is especially true for low cost servos.
Offsets and ratios are defined in the SERVO_CALIBRATION table.
Here is how to use py4bot-gui-servocal.py.
We first need to enable the servo, by clicking the Enable checkbox. Then, we need to check if the servo rotates the right direction: increasing the pulse value should increase the joint angle (= make in turn in the trigonometric sense in the leg coordinate system). If it is not the case, we just click the Invert checkbox (usually, coxa joints are all the same, and other joints should be inverted for legs of one side, but it depends if there is a symmetry in the mechanics or not).
Then, we can set the offset as shown above by moving the Offset slider. This has no impact on the servo position, but changes the table offset.
Next, we need to fine tune the servo neutral position. To do this, we move the Neutral slider until we mechanically reach the correct neutral position.
Once this is done, we can adjust the ratio. This step is a little bit harder, as we need to measure the angle the joint really moves. The best way is to move up to +-90°, as it is visually easy to see, but it is not always mechanically possible, and we can restrict the range to +-45°. But we have to keep in mind that the larger the angle is, the better the accuracy will be.
So, we move the Test Angle slider to 45°. Then, we move the Ratio slider so the joint really reaches 45°. Finally, we can check if going to -45° moves the joint to the symmetrical position.
We of course need to repeat the entire procedure for each servo/joint, which can be tedious for a 4 DoF hexapod :o/ But after that, our robot should walk better ;o)
Note that if we already have a settings.py module, we can launch py4bot-gui-servocal.py from the directory containing that module in order to reload the previous values. And if the module contains a LEGS_SERVOS_MAPPING, the script will show the legs/joints names. So, it is better to start writing this param, before launching the script.
Gaits and GaitSequencer
The Gaits and GaitSequencer implement the dynamic part of the movements, ie the gait itself. It computes the successive feet positions in order to make the robot walk.

Remote controllers
The RemoteControl translates user orders to Robot/GaitSequencer methods calls.

As you can see on the UML diagram, a RemoteControl object is build with Components; a Component can be a Button, a Analog axis, or a Joystick, which is several Analog axes bound together.
Using Mappers
Mappers are simple objects helping to adapt params from RemoteControl Components output to Robot/GaitSequencer methods input.
For example, to control the robot walk, we can create a Joystick component with 3 axes: X, Y, RZ.
But the GaitSequencer walk() method expects speed, direction, length and angle params. Using the MapperWalk mapper, you can compute all these params from X/Y/RZ axes, and send them to the walk() method. That's what we did in the tutorials.
See py4bot/inputs/mappers/mapper.py to see how this mapper is defined.
Of course, you can define your own Mappers.
Add a new Frontend
Frontends are responsible of generating states. This is where specific controllers implementation live.
There are some usefull Frontends defined in Py4bot, mainly USB-based, using event interface.
Attachments (8)
-
IK3DoF.png
(13.3 KB
) - added by 10 years ago.
IK 3DoF
-
IK4DoF.png
(14.6 KB
) - added by 10 years ago.
IK 3Do4
-
body_legs.png
(17.0 KB
) - added by 10 years ago.
Body/legs geometry
-
coordinates_systems.png
(22.6 KB
) - added by 10 years ago.
Coordinates systems
-
design_simple.png
(76.7 KB
) - added by 10 years ago.
Design - main parts
- design_remote-control.png (89.0 KB ) - added by 10 years ago.
- design_gait.png (87.3 KB ) - added by 10 years ago.
-
py4bot-gui-servocal.png
(233.0 KB
) - added by 9 years ago.
Screenshot of servos calibrator tool
Download all attachments as: .zip