| Version 6 (modified by , 9 years ago) ( diff ) |
|---|
Tutorial 4: Add input frontend
Files for this tutorial are available in py4bot/examples/tutorial_4/.
Here, we will see how to create a custom input frontend class for a new gamepad. This tutorial assumes you are running a linux OS.
Again, we create a new empty dir in our home dir:
$ mkdir tutorial_4
$ cd tutorial_4
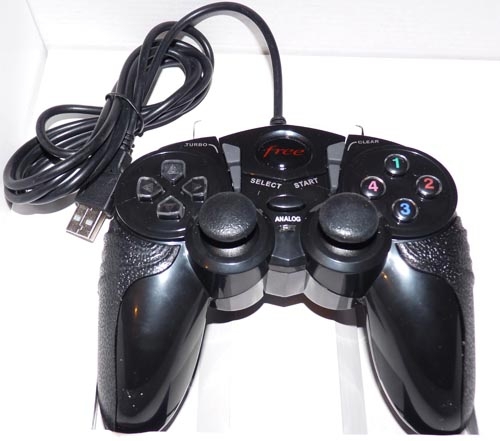
As example, we are going to add support for the gamepad of the Freebox Revolution v6 ADSL box, widely used in France:

(Note that this model has been replaced by another one)
First, we need to know how this gamepad is detected by the kernel. For that, we just launch, from a console, the command:
$ sudo journalctl -f
and plug the gamepad. Here is what the kernel outputs:
[3687970.593351] usb 2-1.7: new low-speed USB device number 15 using ehci-pci
[3687970.706423] usb 2-1.7: New USB device found, idVendor=0079, idProduct=0006
[3687970.706426] usb 2-1.7: New USB device strings: Mfr=1, Product=2, SerialNumber=0
[3687970.706428] usb 2-1.7: Product: Generic   USB  Joystick
[3687970.706430] usb 2-1.7: Manufacturer: DragonRise Inc.
[3687974.416506] input: DragonRise Inc.   Generic   USB  Joystick   as /devices/pci0000:00/0000:00:1d.0/usb2/2-1/2-1.7/2-1.7:1.0/0003:0079:0006.0004/input/input15
[3687974.416759] dragonrise 0003:0079:0006.0004: input,hidraw3: USB HID v1.10 Joystick [DragonRise Inc.   Generic   USB  Joystick  ] on usb-0000:00:1d.0-1.7/input0
[3687974.416780] dragonrise 0003:0079:0006.0004: Force Feedback for DragonRise Inc. game controllers by Richard Walmsley <richwalm@gmail.com>
Py4bot comes with py4bot-gui-evcal.py, a graphical tool to retreive an usb input device mapping. To use it, we need to give it the device path in /dev. Let's see what is our gamepad path:
$ ls -1 /dev/input/by-id/
usb-1bcf_USB_Optical_Mouse-event-mouse
usb-1bcf_USB_Optical_Mouse-mouse
usb-DragonRise_Inc._Generic_USB_Joystick-event-joystick
usb-DragonRise_Inc._Generic_USB_Joystick-joystick
usb-Microsoft_Microsoft®_Digital_Media_Keyboard_3000-event-kbd
usb-Microsoft_Microsoft®_Digital_Media_Keyboard_3000-if01-event-kbd
Here, the path to use is /dev/input/by-id/usb-DragonRise_Inc._Generic_USB_Joystick-event-joystick:
$ py4bot-gui-evcal.py /dev/input/by-id/usb-DragonRise_Inc._Generic_USB_Joystick-event-joystick

{('EV_ABS', 3L): [(('ABS_X', 0L),
                   AbsInfo(value=127, min=0, max=255, fuzz=0, flat=15, resolution=0)),
                  (('ABS_Y', 1L),
                   AbsInfo(value=127, min=0, max=255, fuzz=0, flat=15, resolution=0)),
                  (('ABS_Z', 2L),
                   AbsInfo(value=131, min=0, max=255, fuzz=0, flat=15, resolution=0)),
                  (('ABS_RX', 3L),
                   AbsInfo(value=127, min=0, max=255, fuzz=0, flat=15, resolution=0)),
                  (('ABS_RZ', 5L),
                   AbsInfo(value=127, min=0, max=255, fuzz=0, flat=15, resolution=0)),
                  (('ABS_HAT0X', 16L),
                   AbsInfo(value=0, min=-1, max=1, fuzz=0, flat=0, resolution=0)),
                  (('ABS_HAT0Y', 17L),
                   AbsInfo(value=0, min=-1, max=1, fuzz=0, flat=0, resolution=0))],
 ('EV_FF', 21L): [(['FF_EFFECT_MIN', 'FF_RUMBLE'], 80L),
                  ('FF_PERIODIC', 81L),
                  (['FF_SQUARE', 'FF_WAVEFORM_MIN'], 88L),
                  ('FF_TRIANGLE', 89L),
                  ('FF_SINE', 90L),
                  (['FF_GAIN', 'FF_MAX_EFFECTS'], 96L)],
 ('EV_KEY', 1L): [(['BTN_JOYSTICK', 'BTN_TRIGGER'], 288L),
                  ('BTN_THUMB', 289L),
                  ('BTN_THUMB2', 290L),
                  ('BTN_TOP', 291L),
                  ('BTN_TOP2', 292L),
                  ('BTN_PINKIE', 293L),
                  ('BTN_BASE', 294L),
                  ('BTN_BASE2', 295L),
                  ('BTN_BASE3', 296L),
                  ('BTN_BASE4', 297L),
                  ('BTN_BASE5', 298L),
                  ('BTN_BASE6', 299L)],
 ('EV_MSC', 4L): [('MSC_SCAN', 4L)],
 ('EV_SYN', 0L): [('SYN_REPORT', 0L),
                  ('SYN_CONFIG', 1L),
                  ('SYN_DROPPED', 3L),
                  ('?', 4L),
                  ('?', 21L)]}
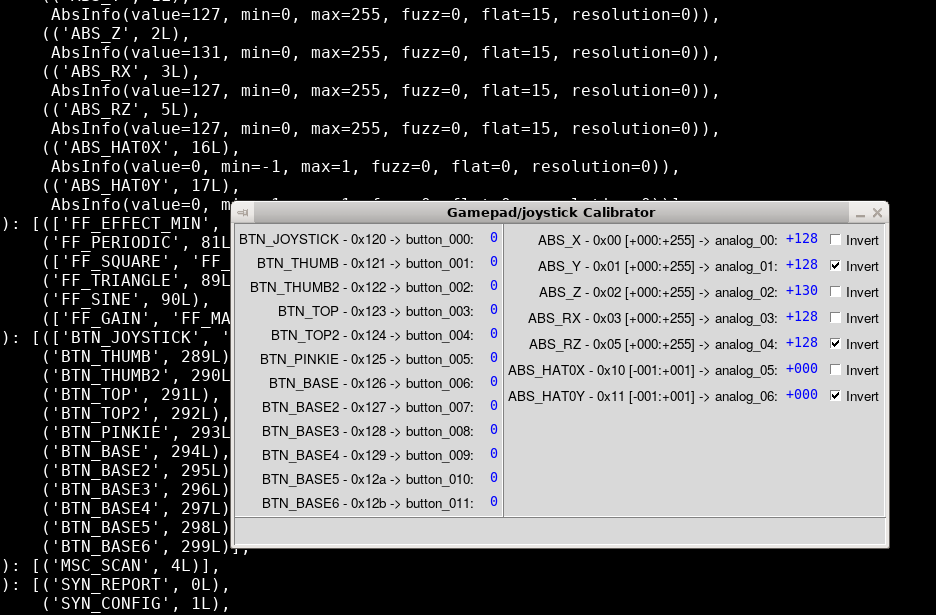
The script automatically retreives the mapping, and creates a nice GUI:

Here, we can play with buttons. For analog axis to work, we need to press the Analog button; the red light should turn on.
When playing with analog axis, we can see that a few of them are inverted. Py4bot expects than values increase when you push axis front/right. If it is not the case, we need to click the Invert checkbox.
Note that on this specific gamepad, the ABS_Z axis is a combination of ABS_X and ABS_RZ. Don't know what is the purpose... I suggest we don't use it.
Anyway, we should now have the following config:

Then, we just quit the script by closing the window. In the console, we see the final config:
BUTTON_MAPPING = {
    0x120:   0,  # BTN_JOYSTICK
    0x121:   1,  # BTN_THUMB
    0x122:   2,  # BTN_THUMB2
    0x123:   3,  # BTN_TOP
    0x124:   4,  # BTN_TOP2
    0x125:   5,  # BTN_PINKIE
    0x126:   6,  # BTN_BASE
    0x127:   7,  # BTN_BASE2
    0x128:   8,  # BTN_BASE3
    0x129:   9,  # BTN_BASE4
    0x12a:  10,  # BTN_BASE5
    0x12b:  11,  # BTN_BASE6
}

AXIS_MAPPING = {
    0x00:  0,  # ABS_X
    0x01:  1,  # ABS_Y
    0x02:  2,  # ABS_Z
    0x03:  3,  # ABS_RX
    0x05:  4,  # ABS_RZ
    0x10:  5,  # ABS_HAT0X
    0x11:  6,  # ABS_HAT0Y
}

DEFAULT_CALIBRATION = {
     0: (  +0, +255),  # ABS_X
     1: (+255,   +0),  # ABS_Y
     2: (  +0, +255),  # ABS_Z
     3: (  +0, +255),  # ABS_RX
     4: (+255,   +0),  # ABS_RZ
     5: (  -1,   +1),  # ABS_HAT0X
     6: (  +1,   -1),  # ABS_HAT0Y
}
Let's now create a file named dragonRise.py. At the top of the file, we add a few imports:
from py4bot.services.logger import Logger
from py4bot.common.intervalMapper import IntervalMapper
from py4bot.inputs.frontends.frontendUsb import FrontendUsb
Then, we copy/paste the output of the script:
# Button mapping
BUTTON_MAPPING = {
    0x120:   0,  # BTN_JOYSTICK
    0x121:   1,  # BTN_THUMB
    0x122:   2,  # BTN_THUMB2
    0x123:   3,  # BTN_TOP
    0x124:   4,  # BTN_TOP2
    0x125:   5,  # BTN_PINKIE
    0x126:   6,  # BTN_BASE
    0x127:   7,  # BTN_BASE2
    0x128:   8,  # BTN_BASE3
    0x129:   9,  # BTN_BASE4
    0x12a:  10,  # BTN_BASE5
    0x12b:  11,  # BTN_BASE6
}

# Axis mapping
AXIS_MAPPING = {
    0x00:  0,  # ABS_X
    0x01:  1,  # ABS_Y
    0x02:  2,  # ABS_Z
    0x03:  3,  # ABS_RX
    0x05:  4,  # ABS_RZ
    0x10:  5,  # ABS_HAT0X
    0x11:  6,  # ABS_HAT0Y
}

# Axis calibration
DEFAULT_CALIBRATION = {
    0: (  +0, +255),  # ABS_X
    1: (+255,   +0),  # ABS_Y
    2: (  +0, +255),  # ABS_Z
    3: (  +0, +255),  # ABS_RX
    4: (+255,   +0),  # ABS_RZ
    5: (  -1,   +1),  # ABS_HAT0X
    6: (  +1,   -1),  # ABS_HAT0Y
}
Finally, we create the class itself:
class DragonRise(FrontendUsb):
    """ Freebox Revolution v6 gamepad implementation (first model)
    """
    def __init__(self, path, calibration=DEFAULT_AXIS_CALIBRATION):
        """ Init DragonRise object
        """
        super(DragonRise, self).__init__("DragonRise", path)

        self._intervalMapper = {}
        for axis in calibration.keys():
            self._intervalMapper[axis] = IntervalMapper(calibration[axis])

    def _keyToDigital(self, eventCode):
        code = BUTTON_MAPPING[eventCode]

        return code

    def _absToAnalog(self, eventCode, eventValue):
        axis = AXIS_MAPPING[eventCode]
        value = self._intervalMapper[axis](eventValue)

        return axis, value
That's it, our new gamepad support is added. We can then use it as fronted for our Gamepad class, instead of Thrustmaster (see tutorial 1).
Note that this class is already in Py4bot.
In the next tutorial, we will go deeper in controllers usage.
Attachments (3)
- gamepad_free.jpg (68.6 KB ) - added by 9 years ago.
- py4bot-gui-evcal_1.png (124.1 KB ) - added by 9 years ago.
- py4bot-gui-evcal_2.png (126.7 KB ) - added by 9 years ago.
Download all attachments as: .zip