| Version 3 (modified by , 9 years ago) ( diff ) |
|---|
Tutorial 4: Add input frontend support
Files for this tutorial are available in py4bot/examples/tutorial_4/.
Here, we will see how to create a custom input frontend class for a new gamepad. This tutorial assumes you are running a linux OS.
Again, we create a new empty dir in our home dir:
$ mkdir tutorial_4
$ cd tutorial_4
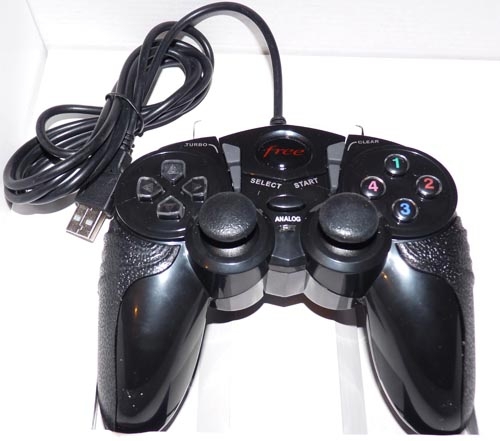
As example, we are going to add support for the gamepad of the Freebox Revolution v6 ADSL box, widely used in France:

(Note that this model has been replaced by another one)
First, we need to know how this gamepad is detected by the kernel. For that, we just launch, from a console, the command:
$ sudo journalctl -f
and plug the gamepad. Here is what the kernel outputs:
[3687970.593351] usb 2-1.7: new low-speed USB device number 15 using ehci-pci
[3687970.706423] usb 2-1.7: New USB device found, idVendor=0079, idProduct=0006
[3687970.706426] usb 2-1.7: New USB device strings: Mfr=1, Product=2, SerialNumber=0
[3687970.706428] usb 2-1.7: Product: Generic   USB  Joystick
[3687970.706430] usb 2-1.7: Manufacturer: DragonRise Inc.
[3687974.416506] input: DragonRise Inc.   Generic   USB  Joystick   as /devices/pci0000:00/0000:00:1d.0/usb2/2-1/2-1.7/2-1.7:1.0/0003:0079:0006.0004/input/input15
[3687974.416759] dragonrise 0003:0079:0006.0004: input,hidraw3: USB HID v1.10 Joystick [DragonRise Inc.   Generic   USB  Joystick  ] on usb-0000:00:1d.0-1.7/input0
[3687974.416780] dragonrise 0003:0079:0006.0004: Force Feedback for DragonRise Inc. game controllers by Richard Walmsley <richwalm@gmail.com>
Py4bot comes with py4bot-gui-evcal.py, a graphical tool to retreive an usb input device mapping. To use it, we need to give it the device path in /dev. Let's see what is our gamepad path:
$ ls -1 /dev/input/by-id/
usb-1bcf_USB_Optical_Mouse-event-mouse
usb-1bcf_USB_Optical_Mouse-mouse
usb-DragonRise_Inc._Generic_USB_Joystick-event-joystick
usb-DragonRise_Inc._Generic_USB_Joystick-joystick
usb-Microsoft_Microsoft®_Digital_Media_Keyboard_3000-event-kbd
usb-Microsoft_Microsoft®_Digital_Media_Keyboard_3000-if01-event-kbd
Here, the path to use is /dev/input/by-id/usb-DragonRise_Inc._Generic_USB_Joystick-event-joystick:
$ py4bot-gui-evcal.py /dev/input/by-id/usb-DragonRise_Inc._Generic_USB_Joystick-event-joystick

{('EV_ABS', 3L): [(('ABS_X', 0L),
                   AbsInfo(value=127, min=0, max=255, fuzz=0, flat=15, resolution=0)),
                  (('ABS_Y', 1L),
                   AbsInfo(value=127, min=0, max=255, fuzz=0, flat=15, resolution=0)),
                  (('ABS_Z', 2L),
                   AbsInfo(value=131, min=0, max=255, fuzz=0, flat=15, resolution=0)),
                  (('ABS_RX', 3L),
                   AbsInfo(value=127, min=0, max=255, fuzz=0, flat=15, resolution=0)),
                  (('ABS_RZ', 5L),
                   AbsInfo(value=127, min=0, max=255, fuzz=0, flat=15, resolution=0)),
                  (('ABS_HAT0X', 16L),
                   AbsInfo(value=0, min=-1, max=1, fuzz=0, flat=0, resolution=0)),
                  (('ABS_HAT0Y', 17L),
                   AbsInfo(value=0, min=-1, max=1, fuzz=0, flat=0, resolution=0))],
 ('EV_FF', 21L): [(['FF_EFFECT_MIN', 'FF_RUMBLE'], 80L),
                  ('FF_PERIODIC', 81L),
                  (['FF_SQUARE', 'FF_WAVEFORM_MIN'], 88L),
                  ('FF_TRIANGLE', 89L),
                  ('FF_SINE', 90L),
                  (['FF_GAIN', 'FF_MAX_EFFECTS'], 96L)],
 ('EV_KEY', 1L): [(['BTN_JOYSTICK', 'BTN_TRIGGER'], 288L),
                  ('BTN_THUMB', 289L),
                  ('BTN_THUMB2', 290L),
                  ('BTN_TOP', 291L),
                  ('BTN_TOP2', 292L),
                  ('BTN_PINKIE', 293L),
                  ('BTN_BASE', 294L),
                  ('BTN_BASE2', 295L),
                  ('BTN_BASE3', 296L),
                  ('BTN_BASE4', 297L),
                  ('BTN_BASE5', 298L),
                  ('BTN_BASE6', 299L)],
 ('EV_MSC', 4L): [('MSC_SCAN', 4L)],
 ('EV_SYN', 0L): [('SYN_REPORT', 0L),
                  ('SYN_CONFIG', 1L),
                  ('SYN_DROPPED', 3L),
                  ('?', 4L),
                  ('?', 21L)]}
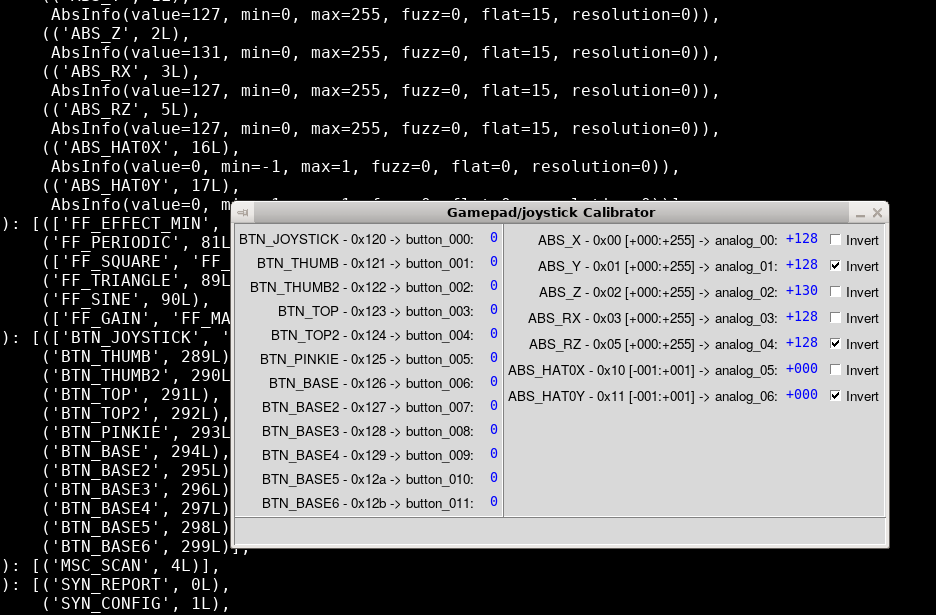
The script automatically retreives the mapping, and creates a nice GUI:

Here, we can play with buttons. For analog axis to work, we need to press the Analog button; the red light should turn on.
When playing with analog axis, we can see that a few of them are inverted. Py4bot expects than values increase when you push axis front/right. If it is not the case, we need to click the Invert checkbox.
Note that on this specific gamepad, the ABS_Z axis is a combination of ABS_X and ABS_RZ. Don't know what is the purpose... I suggest we don't use it.
Anyway, we should now have the following config:

Then, we just quit the script by closing the window. In the console, we see the final config:
BUTTON_MAPPING = {
    0x120:   0,  # BTN_JOYSTICK
    0x121:   1,  # BTN_THUMB
    0x122:   2,  # BTN_THUMB2
    0x123:   3,  # BTN_TOP
    0x124:   4,  # BTN_TOP2
    0x125:   5,  # BTN_PINKIE
    0x126:   6,  # BTN_BASE
    0x127:   7,  # BTN_BASE2
    0x128:   8,  # BTN_BASE3
    0x129:   9,  # BTN_BASE4
    0x12a:  10,  # BTN_BASE5
    0x12b:  11,  # BTN_BASE6
}

AXIS_MAPPING = {
    0x00:  0,  # ABS_X
    0x01:  1,  # ABS_Y
    0x02:  2,  # ABS_Z
    0x03:  3,  # ABS_RX
    0x05:  4,  # ABS_RZ
    0x10:  5,  # ABS_HAT0X
    0x11:  6,  # ABS_HAT0Y
}

DEFAULT_CALIBRATION = {
     0: (  +0, +255),  # ABS_X
     1: (+255,   +0),  # ABS_Y
     2: (  +0, +255),  # ABS_Z
     3: (  +0, +255),  # ABS_RX
     4: (+255,   +0),  # ABS_RZ
     5: (  -1,   +1),  # ABS_HAT0X
     6: (  +1,   -1),  # ABS_HAT0Y
}
Let's now create a file named dragonRise.py. At the top of the file, we add a few imports:
from py4bot.services.logger import Logger
from py4bot.common.intervalMapper import IntervalMapper
from py4bot.inputs.frontends.frontendUsb import FrontendUsb
Then, we copy/paste the output of the script:
# Button mapping
BUTTON_MAPPING = {
    0x120:   0,  # BTN_JOYSTICK
    0x121:   1,  # BTN_THUMB
    0x122:   2,  # BTN_THUMB2
    0x123:   3,  # BTN_TOP
    0x124:   4,  # BTN_TOP2
    0x125:   5,  # BTN_PINKIE
    0x126:   6,  # BTN_BASE
    0x127:   7,  # BTN_BASE2
    0x128:   8,  # BTN_BASE3
    0x129:   9,  # BTN_BASE4
    0x12a:  10,  # BTN_BASE5
    0x12b:  11,  # BTN_BASE6
}

# Axis mapping
AXIS_MAPPING = {
    0x00:  0,  # ABS_X
    0x01:  1,  # ABS_Y
    0x02:  2,  # ABS_Z
    0x03:  3,  # ABS_RX
    0x05:  4,  # ABS_RZ
    0x10:  5,  # ABS_HAT0X
    0x11:  6,  # ABS_HAT0Y
}

# Axis calibration
DEFAULT_CALIBRATION = {
    0: (  +0, +255),  # ABS_X
    1: (+255,   +0),  # ABS_Y
    2: (  +0, +255),  # ABS_Z
    3: (  +0, +255),  # ABS_RX
    4: (+255,   +0),  # ABS_RZ
    5: (  -1,   +1),  # ABS_HAT0X
    6: (  +1,   -1),  # ABS_HAT0Y
}
Finally, we create the class itself:
class DragonRise(FrontendUsb):
    """ Freebox Revolution v6 gamepad implementation (first model)
    """
    def __init__(self, path, calibration=DEFAULT_AXIS_CALIBRATION):
        """ Init DragonRise object
        """
        super(DragonRise, self).__init__("DragonRise", path)

        self._intervalMapper = {}
        for axis in calibration.keys():
            self._intervalMapper[axis] = IntervalMapper(calibration[axis])

    def _keyToButton(self, eventCode):
        code = BUTTON_MAPPING[eventCode]

        return code

    def _absToAnalog(self, eventCode, eventValue):
        axis = AXIS_MAPPING[eventCode]
        value = self._intervalMapper[axis](eventValue)

        return axis, value
That's it, our new gamepad support is added. We can then use it as fronted for our Gamepad class, instead of Thrustmaster (see [Tutorial1FirstRobot tutorial 1]).
Note that this class is already in Py4bot.
In the [Tutorial5AdvancedRemoteControlUsage next tutorial], we will go deeper in controllers usage.
Attachments (3)
- gamepad_free.jpg (68.6 KB ) - added by 9 years ago.
- py4bot-gui-evcal_1.png (124.1 KB ) - added by 9 years ago.
- py4bot-gui-evcal_2.png (126.7 KB ) - added by 9 years ago.
Download all attachments as: .zip